1. Project Overview & Learning Objectives
What We’re Building: A complete Task Manager REST API that supports user authentication, CRUD operations for tasks, task categorization with tags, due dates, and proper security measures. This API will be production-ready with testing, logging, error handling, and deployment automation.
Learning Objectives:
- Write automated tests using Jest and Supertest
- Apply linting for early error detection and consistent code quality
- Containerize applications with Docker for consistent deployment
- Set up CI/CD pipelines with GitHub Actions
- Deploy to cloud platforms with environment management
2. Prerequisites & Initial Setup
Required tools
- Node.js 22 LTS (current recommended version as of 2025)
- Git
- Basic PostgreSQL knowledge
- Docker
- Docker Hub account
- Render account
3. Step-by-Step Implementation
Step 1: Initial configuration
Add these scripts to package.json:
  "scripts": {
    ...
    "test": "NODE_ENV=test jest",
    "test:watch": "NODE_ENV=test jest --watch",
    "test:coverage": "NODE_ENV=test jest --coverage",
    "lint": "eslint src/",
    "lint:fix": "eslint src/ --fix",
    ...
  },
Because we’re using the .eslintrc.js format we need to downgrade the version of the eslint package in package.json:
  "devDependencies": {
    ..
    "eslint": "^8.57.0",
    ..
  }
Save the file and run npm install and you’re good to go!
Step 2: Testing with Jest and Supertest
Jest is a full-featured testing framework developed by Facebook. It’s designed for testing JavaScript and TypeScript applications and comes with everything you need out of the box.
Why use Jest:
-
All-in-one solution — includes a test runner, assertion library, mocking, and coverage reporting — no need to configure multiple tools.
-
Fast and parallel — runs tests in parallel across multiple workers for speed.
-
Great developer experience — colorful, readable output, and good error reporting.
-
Snapshot testing — allows you to test outputs like JSON or UI components easily.
-
Easy mocking — built-in utilities for mocking modules, timers, and functions.
-
TypeScript support — integrates well with ts-jest for typed projects.
Think of Jest as your testing foundation — it runs and validates your tests.
Supertest is a library for testing HTTP servers (like Express apps). It lets you make HTTP requests directly to your app without actually running a network server.
Why use Supertest:
-
Simplifies API testing — no need to start the server on a port; it directly hooks into your app.
-
Fluent syntax — easy-to-read chained methods like:
request(app).get("/users").expect(200);-
Integrates perfectly with Jest — you can use Jest’s assertions (expect()) with Supertest’s request responses.
-
Realistic — simulates real HTTP calls, ensuring your endpoints, middleware, and routes behave correctly.
-
Supports all HTTP methods — .get(), .post(), .put(), .delete(), etc.
Think of Supertest as the bridge between your tests and your API endpoints — it allows you to “hit” your endpoints and check their behavior.
Create jest.config.js:
module.exports = {
	testEnvironment: "node",
	collectCoverage: true,
	coverageDirectory: "coverage",
	coveragePathIgnorePatterns: ["/node_modules/", "/tests/"],
	testMatch: ["**/tests/**/*.test.js", "**/src/**/*.test.js"],
	setupFilesAfterEnv: ["<rootDir>/src/tests/setup.js"],
	testTimeout: 30000, // Increased timeout for database operations
	maxWorkers: 1, // Run tests sequentially to avoid database conflicts
};
Create .env.test:
# Test Environment Configuration
DATABASE_URL=your-neon-db-url #for tests you can create another branch in your db
JWT_SECRET=test-jwt-secret-key-for-testing-only
JWT_EXPIRES_IN=1h
NODE_ENV=test
PORT=3001
RATE_LIMIT_WINDOW_MS=60000
RATE_LIMIT_MAX_REQUESTS=1000
LOG_LEVEL=error
Create tests/setup.js:
const path = require("path");

// Load test environment variables from .env.test file FIRST
require("dotenv").config({ path: path.join(__dirname, "../../.env.test") });

// Now import and create Prisma client after env vars are loaded
const getPrismaClient = require("../database/prisma");
const prisma = getPrismaClient();

// Test database connection before running tests
beforeAll(async () => {
	try {
		await prisma.$connect();
		console.log("✅ Database connection established for tests");
	} catch (error) {
		console.error("❌ Failed to connect to database:", error.message);
		throw error;
	}
});

// Clean database before each test
beforeEach(async () => {
	try {
		// Delete in correct order to respect foreign key constraints
		await prisma.taskTag.deleteMany();
		await prisma.task.deleteMany();
		await prisma.tag.deleteMany();
		await prisma.user.deleteMany();
	} catch (error) {
		console.error("Error cleaning database:", error.message);
		// Don't throw here to avoid stopping all tests
	}
});

// Close database connection after all tests
afterAll(async () => {
	try {
		await prisma.$disconnect();
		console.log("✅ Database connection closed");
	} catch (error) {
		console.error("Error disconnecting from database:", error.message);
	}
});

global.prisma = prisma;
Create src/tests/auth.test.js:
const request = require("supertest");
const app = require("../app");

describe("Authentication Endpoints", () => {
	describe("POST /api/auth/register", () => {
		const validUser = {
			email: "test@example.com",
			password: "TestPass123",
			name: "Test User",
		};

		it("should register a new user successfully", async () => {
			const response = await request(app)
				.post("/api/auth/register")
				.send(validUser);

			expect(response.status).toBe(201);
			expect(response.body.success).toBe(true);
			expect(response.body.data.user.email).toBe(validUser.email);
			expect(response.body.data.token).toBeDefined();
			expect(response.body.data.user.password).toBeUndefined();
		});

		it("should fail with invalid email", async () => {
			const response = await request(app)
				.post("/api/auth/register")
				.send({
					...validUser,
					email: "invalid-email",
				});

			expect(response.status).toBe(400);
			expect(response.body.success).toBe(false);
			expect(response.body.errors.email).toBeDefined();
		});

		it("should fail with weak password", async () => {
			const response = await request(app)
				.post("/api/auth/register")
				.send({
					...validUser,
					password: "weak",
				});

			expect(response.status).toBe(400);
			expect(response.body.success).toBe(false);
			expect(response.body.errors.password).toBeDefined();
		});

		it("should fail with duplicate email", async () => {
			// First registration
			await request(app).post("/api/auth/register").send(validUser);

			// Second registration with same email
			const response = await request(app)
				.post("/api/auth/register")
				.send(validUser);

			expect(response.status).toBe(500);
			expect(response.body.success).toBe(false);
		});
	});

	describe("POST /api/auth/login", () => {
		const userData = {
			email: "test@example.com",
			password: "TestPass123",
			name: "Test User",
		};

		beforeEach(async () => {
			// Register user before each login test
			await request(app).post("/api/auth/register").send(userData);
		});

		it("should login successfully with valid credentials", async () => {
			const response = await request(app).post("/api/auth/login").send({
				email: userData.email,
				password: userData.password,
			});

			expect(response.status).toBe(200);
			expect(response.body.success).toBe(true);
			expect(response.body.data.user.email).toBe(userData.email);
			expect(response.body.data.token).toBeDefined();
		});

		it("should fail with invalid credentials", async () => {
			const response = await request(app).post("/api/auth/login").send({
				email: userData.email,
				password: "wrongpassword",
			});

			expect(response.status).toBe(500);
			expect(response.body.success).toBe(false);
		});
	});

	describe("GET /api/auth/profile", () => {
		let authToken;

		beforeEach(async () => {
			const userResponse = await request(app).post("/api/auth/register").send({
				email: "test@example.com",
				password: "TestPass123",
				name: "Test User",
			});

			authToken = userResponse.body.data.token;
		});

		it("should get user profile with valid token", async () => {
			const response = await request(app)
				.get("/api/auth/profile")
				.set("Authorization", `Bearer ${authToken}`);

			expect(response.status).toBe(200);
			expect(response.body.success).toBe(true);
			expect(response.body.data.user.email).toBe("test@example.com");
		});

		it("should fail without token", async () => {
			const response = await request(app).get("/api/auth/profile");

			expect(response.status).toBe(401);
			expect(response.body.success).toBe(false);
		});
	});
});
Create src/tests/tasks.test.js:
const request = require("supertest");
const app = require("../app");

describe("Task Endpoints", () => {
	let authToken;
	let userId;

	beforeEach(async () => {
		// Register and login user for each test
		const userResponse = await request(app).post("/api/auth/register").send({
			email: "test@example.com",
			password: "TestPass123",
			name: "Test User",
		});

		authToken = userResponse.body.data.token;
		userId = userResponse.body.data.user.id;
	});

	describe("POST /api/tasks", () => {
		const validTask = {
			title: "Test Task",
			description: "Test Description",
			priority: "HIGH",
			dueDate: "2025-12-31T23:59:59.000Z",
			tags: ["work", "urgent"],
		};

		it("should create a task successfully", async () => {
			const response = await request(app)
				.post("/api/tasks")
				.set("Authorization", `Bearer ${authToken}`)
				.send(validTask);

			expect(response.status).toBe(201);
			expect(response.body.success).toBe(true);
			expect(response.body.data.task.title).toBe(validTask.title);
			expect(response.body.data.task.status).toBe("PENDING");
			expect(response.body.data.task.tags).toHaveLength(2);
		});

		it("should fail without authentication", async () => {
			const response = await request(app).post("/api/tasks").send(validTask);

			expect(response.status).toBe(401);
			expect(response.body.success).toBe(false);
		});

		it("should fail with empty title", async () => {
			const response = await request(app)
				.post("/api/tasks")
				.set("Authorization", `Bearer ${authToken}`)
				.send({
					...validTask,
					title: "",
				});

			expect(response.status).toBe(400);
			expect(response.body.success).toBe(false);
			expect(response.body.errors.title).toBeDefined();
		});
	});

	describe("GET /api/tasks", () => {
		beforeEach(async () => {
			// Create some test tasks
			const tasks = [
				{ title: "Task 1", status: "PENDING", priority: "HIGH" },
				{ title: "Task 2", status: "COMPLETED", priority: "LOW" },
				{ title: "Task 3", status: "IN_PROGRESS", priority: "MEDIUM" },
			];

			for (const task of tasks) {
				await request(app)
					.post("/api/tasks")
					.set("Authorization", `Bearer ${authToken}`)
					.send(task);
			}
		});

		it("should get all tasks for authenticated user", async () => {
			const response = await request(app)
				.get("/api/tasks")
				.set("Authorization", `Bearer ${authToken}`);

			expect(response.status).toBe(200);
			expect(response.body.success).toBe(true);
			expect(response.body.data.tasks).toHaveLength(3);
			expect(response.body.data.pagination.total).toBe(3);
		});

		it("should filter tasks by status", async () => {
			const response = await request(app)
				.get("/api/tasks?status=COMPLETED")
				.set("Authorization", `Bearer ${authToken}`);

			expect(response.status).toBe(200);
			expect(response.body.data.tasks).toHaveLength(1);
			expect(response.body.data.tasks[0].status).toBe("COMPLETED");
		});

		it("should paginate results", async () => {
			const response = await request(app)
				.get("/api/tasks?page=1&limit=2")
				.set("Authorization", `Bearer ${authToken}`);

			expect(response.status).toBe(200);
			expect(response.body.data.tasks).toHaveLength(2);
			expect(response.body.data.pagination.page).toBe(1);
			expect(response.body.data.pagination.limit).toBe(2);
		});
	});

	describe("PUT /api/tasks/:id", () => {
		let taskId;

		beforeEach(async () => {
			const taskResponse = await request(app)
				.post("/api/tasks")
				.set("Authorization", `Bearer ${authToken}`)
				.send({
					title: "Original Task",
					description: "Original Description",
				});

			taskId = taskResponse.body.data.task.id;
		});

		it("should update task successfully", async () => {
			const updateData = {
				title: "Updated Task",
				status: "COMPLETED",
			};

			const response = await request(app)
				.put(`/api/tasks/${taskId}`)
				.set("Authorization", `Bearer ${authToken}`)
				.send(updateData);

			expect(response.status).toBe(200);
			expect(response.body.success).toBe(true);
			expect(response.body.data.task.title).toBe(updateData.title);
			expect(response.body.data.task.status).toBe(updateData.status);
		});

		it("should fail with invalid task ID", async () => {
			const response = await request(app)
				.put("/api/tasks/999999")
				.set("Authorization", `Bearer ${authToken}`)
				.send({ title: "Updated Task" });

			expect(response.status).toBe(500);
			expect(response.body.success).toBe(false);
		});
	});

	describe("DELETE /api/tasks/:id", () => {
		let taskId;

		beforeEach(async () => {
			const taskResponse = await request(app)
				.post("/api/tasks")
				.set("Authorization", `Bearer ${authToken}`)
				.send({
					title: "Task to Delete",
					description: "This task will be deleted",
				});

			taskId = taskResponse.body.data.task.id;
		});

		it("should delete task successfully", async () => {
			const response = await request(app)
				.delete(`/api/tasks/${taskId}`)
				.set("Authorization", `Bearer ${authToken}`);

			expect(response.status).toBe(200);
			expect(response.body.success).toBe(true);

			// Verify task is deleted
			const getResponse = await request(app)
				.get(`/api/tasks/${taskId}`)
				.set("Authorization", `Bearer ${authToken}`);

			expect(getResponse.status).toBe(500);
		});
	});
});
Run tests:
# Add test script to package.json
npm test

# Run tests with coverage
npm run test:coverage

# Run tests in watch mode (for development)
npm run test:watch
Step 3: Linting
Linting in a CI/CD pipeline acts as an automated code reviewer that ensures code quality, consistency, and reliability — stopping issues before they reach production.
Create .eslintrc.js:
module.exports = {
	env: {
		node: true,
		es2021: true,
		jest: true,
	},
	extends: ["eslint:recommended"],
	parserOptions: {
		ecmaVersion: 12,
		sourceType: "module",
	},
	rules: {
		"no-console": "warn",
		"no-unused-vars": "warn",
		"no-undef": "error",
		"prefer-const": "error",
		"no-var": "error",
		"object-shorthand": "error",
		"prefer-arrow-callback": "error",
	},
	ignorePatterns: [
		"src/generated/**/*",
		"node_modules/**/*",
		"coverage/**/*",
		"logs/**/*",
	],
};
Step 4: Docker Configuration
Docker is a platform that allows you to build, package, and run applications in lightweight, portable containers.
A container bundles your application’s code together with everything it needs to run — libraries, dependencies, runtime, and configuration — into a single unit that can run consistently anywhere: on your laptop, a server, or in the cloud.
Think of Docker like a shipping container for software:
-
It keeps everything your app needs in one place.
-
It ensures your app runs exactly the same way no matter where it’s deployed.
Without Docker, developers often face the “works on my machine” problem — where code runs fine locally but fails in production due to environment differences.
Create Dockerfile:
# Multi-stage build for optimal image size
FROM node:22-alpine AS base

# Install curl for health checks
RUN apk add --no-cache curl

# Install dependencies only when needed
FROM base AS deps
WORKDIR /app

# Copy package files
COPY package*.json ./
COPY src/prisma ./prisma/

# Install dependencies
RUN npm ci --only=production && npm cache clean --force

# Generate Prisma client
RUN npx prisma generate

# Development stage
FROM base AS development
WORKDIR /app

# Copy package files
COPY package*.json ./
COPY src/prisma ./prisma/

# Install all dependencies (including dev)
RUN npm ci

# Generate Prisma client
RUN npx prisma generate

# Copy source code
COPY . .

# Create non-root user
RUN addgroup -g 1001 -S nodejs
RUN adduser -S nodeapp -u 1001

# Change ownership
RUN chown -R nodeapp:nodejs /app
USER nodeapp

# Expose port
EXPOSE 3000

# Start development server
CMD ["npm", "run", "dev"]

# Production stage
FROM base AS production
WORKDIR /app

# Copy node_modules from deps stage
COPY --from=deps /app/node_modules ./node_modules
COPY --from=deps /app/package*.json ./

# Copy source code
COPY . .

# Create non-root user
RUN addgroup -g 1001 -S nodejs
RUN adduser -S nodeapp -u 1001

# Create logs directory
RUN mkdir -p logs && chown -R nodeapp:nodejs /app
USER nodeapp

# Expose port
EXPOSE 3000

# Health check
HEALTHCHECK --interval=30s --timeout=3s --start-period=5s --retries=3 \
  CMD curl -f http://localhost:3000/healthz || exit 1

# Start production server
CMD ["npm", "start"]
Create docker-compose.yml:
services:
  app:
    build:
      context: .
      target: development
    ports:
      - "3000:3000"
    environment:
      - NODE_ENV=development
      - DATABASE_URL="your-neon-db-url"
      - JWT_SECRET=dev-jwt-secret-change-in-production
      - LOG_LEVEL=debug
    volumes:
      - .:/app
      - /app/node_modules
    depends_on:
      - postgres
    networks:
      - task-manager-network

  postgres:
    image: postgres:15-alpine
    environment:
      - POSTGRES_USER=taskmanager
      - POSTGRES_PASSWORD=password
      - POSTGRES_DB=taskmanager
    ports:
      - "5432:5432"
    volumes:
      - postgres_data:/var/lib/postgresql/data
    networks:
      - task-manager-network

  redis:
    image: redis:7-alpine
    ports:
      - "6379:6379"
    volumes:
      - redis_data:/data
    networks:
      - task-manager-network

volumes:
  postgres_data:
  redis_data:

networks:
  task-manager-network:
    driver: bridge
Create .dockerignore:
node_modules
npm-debug.log
.git
.gitignore
README.md
.env
coverage
.nyc_output
logs
*.log
Build and run with Docker:
# Development with Docker Compose
docker-compose up --build

# Production build
docker build --target production -t task-manager-api .
docker run -p 3000:3000 task-manager-api
Step 5: CI/CD with GitHub Actions
What is CI/CD?
Continuous Integration (CI)
-
Developers regularly push their code changes to a shared repository.
-
Each push triggers an automated workflow (a series of steps) that can include:
- Installing dependencies
- Running tests (e.g., unit or integration tests)
- Performing code quality checks (like linting)
- Building the application
✅ Goal: Detect issues early and ensure the codebase is always stable.
Continuous Deployment / Delivery (CD)
After successful integration, code can be automatically:
-
Delivered to a staging environment for further testing (Continuous Delivery)
-
Or deployed directly to production (Continuous Deployment)
✅ Goal: Make releases fast, reliable, and repeatable without manual intervention.
What is GitHub Actions?
GitHub Actions is GitHub’s native automation tool that lets you create workflows triggered by repository events (like push, pull request, or tag creation). These workflows are defined in a .github/workflows/*.yml file using YAML syntax.
Example:
name: CI/CD Pipeline

on:
  push:
    branches: [main]
  pull_request:
    branches: [main]

jobs:
  build-and-test:
    runs-on: ubuntu-latest
    steps:
      - name: Checkout code
        uses: actions/checkout@v4

      - name: Install dependencies
        run: npm install

      - name: Run tests
        run: npm test

  deploy:
    needs: build-and-test
    runs-on: ubuntu-latest
    if: github.ref == 'refs/heads/main'
    steps:
      - name: Deploy to production
        run: ./deploy.sh
Advantages of using CI/CD with GitHub Actions
-
Native integration with GitHub
- No need for external tools — it’s directly tied to your repository.
- Easy triggers for PRs, pushes, merges, or tags.
-
Improved code quality
- Automated testing and linting ensure every commit is validated before merging.
- Bugs are caught early, reducing regressions.
-
Consistent and reliable deployments
- Automated deployments reduce human error and ensure every release follows the same process.
-
Faster development cycle
- Code is tested and deployed automatically, speeding up feedback and delivery.
-
Scalable and flexible
- You can define multiple workflows (e.g., one for tests, one for deployment).
- Supports matrix builds, environment variables, and reusable workflows.
-
Cost-effective
- GitHub Actions offers free minutes for public repos and generous limits for private ones.
-
Huge community and marketplace
- Thousands of pre-built actions (for Docker, AWS, Azure, Node.js, etc.) make setup faster.
-
Cross-platform
- You can run jobs on Linux, macOS, or Windows virtual environments.
Create .github/workflows/ci.yml:
name: CI/CD Pipeline

on:
  push:
    branches: [main, develop]
  pull_request:
    branches: [main]

jobs:
  test:
    runs-on: ubuntu-latest

    strategy:
      matrix:
        node-version: [22.x]

    services:
      postgres:
        image: postgres:15
        env:
          POSTGRES_USER: test
          POSTGRES_PASSWORD: test
          POSTGRES_DB: test_db
        options: >-
          --health-cmd pg_isready
          --health-interval 10s
          --health-timeout 5s
          --health-retries 5
        ports:
          - 5432:5432

    steps:
      - name: Checkout code
        uses: actions/checkout@v4

      - name: Use Node.js ${{ matrix.node-version }}
        uses: actions/setup-node@v4
        with:
          node-version: ${{ matrix.node-version }}
          cache: "npm"

      - name: Install dependencies
        run: npm ci

      - name: Generate Prisma client
        run: npx prisma generate --schema=src/prisma/schema.prisma

      - name: Run database migrations
        run: npx prisma migrate deploy --schema=src/prisma/schema.prisma
        env:
          DATABASE_URL: ${{ secrets.DATABASE_URL }}

      - name: Run ESLint
        run: npm run lint

      - name: Run tests
        run: npm test
        env:
          NODE_ENV: test
          DATABASE_URL: ${{ secrets.DATABASE_URL }}
          JWT_SECRET: test-secret

      - name: Upload coverage reports
        uses: codecov/codecov-action@v3
        with:
          file: ./coverage/lcov.info
          flags: unittests
          name: codecov-umbrella

  build:
    needs: test
    runs-on: ubuntu-latest
    if: github.ref == 'refs/heads/main'

    steps:
      - name: Checkout code
        uses: actions/checkout@v4

      - name: Set up Docker Buildx
        uses: docker/setup-buildx-action@v3

      - name: Login to Docker Hub
        uses: docker/login-action@v3
        with:
          username: ${{ secrets.DOCKER_USERNAME }}
          password: ${{ secrets.DOCKER_PASSWORD }}

      - name: Build and push Docker image
        uses: docker/build-push-action@v5
        with:
          context: .
          target: production
          push: true
          tags: ${{ secrets.DOCKER_USERNAME }}/task-manager-api:latest
          cache-from: type=gha
          cache-to: type=gha,mode=max

  deploy:
    needs: build
    runs-on: ubuntu-latest
    if: github.ref == 'refs/heads/main'

    steps:
      - name: Deploy to Render
        uses: johnbeynon/render-deploy-action@v0.0.8
        with:
          service-id: ${{ secrets.RENDER_SERVICE_ID }}
          api-key: ${{ secrets.RENDER_API_KEY }}
GitHub Secrets
In your GitHub repository → Settings → Secrets and variables → Actions, add:
- DOCKER_USERNAME: Your Docker Hub username
- DOCKER_PASSWORD: Your Docker Hub password/token
- RENDER_SERVICE_ID: The service ID you copied (e.g., srv-abc123def456)
- RENDER_API_KEY: Your Render API key
How can I get a Render Service ID and API Key?
To get the service ID:
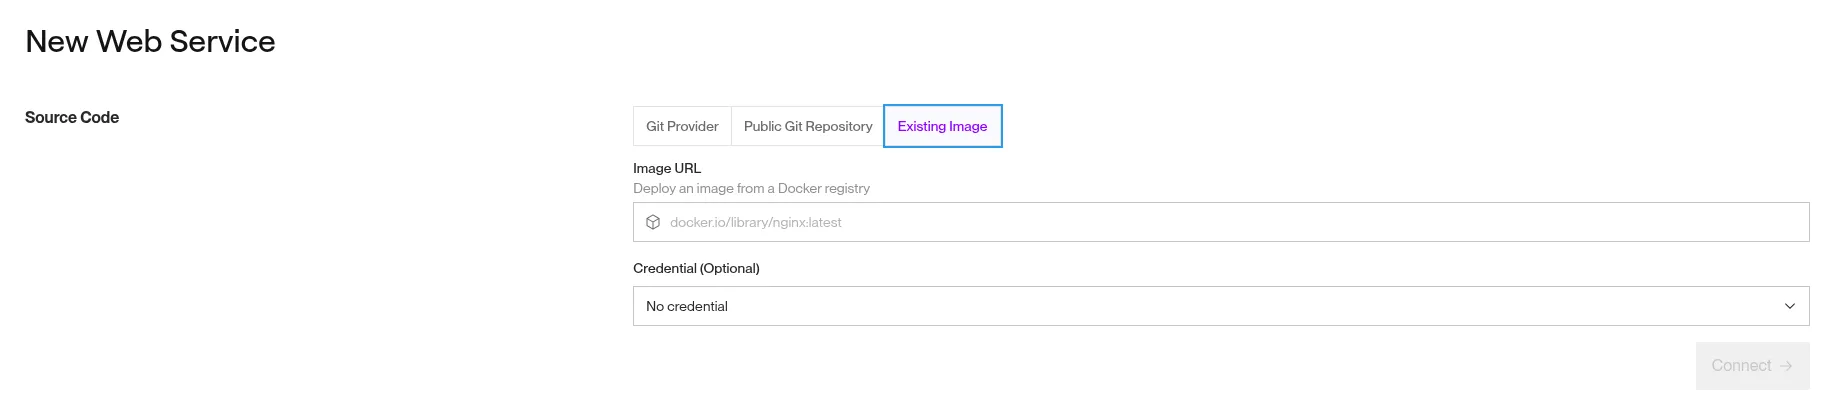
Go to render.com:
- Sign-up if you don’t have an account
- On the top bar -> New -> Web Service

-
Choose the option Existing Image:
-
You should see your previously built docker container:

-
This is the image URL we need for our new webservice in Render:
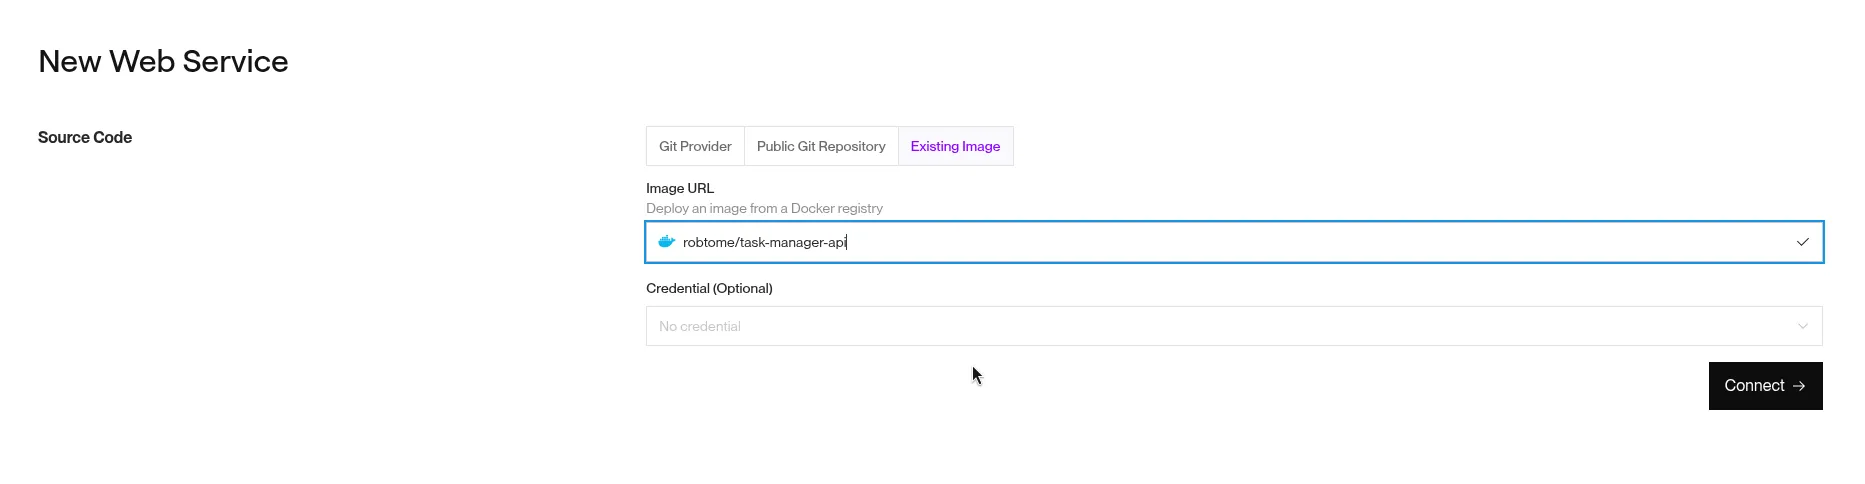
-
After clicking Connect you’ll be directed to the deploy page.
-
In instance Type chose For hobby projects
-
Finally on the bottom of the page you need to specify the environment variables:
- DATABASE_URL: your-neon-db-url
- JWT: your-jwt-super-duper-secret
- NODE_ENV: production
- PORT: 3000
-
Click Deploy Web Service
-
If you now go to your projects page you should see a new project, click on it and copy the service ID:
To get the API Key:
-
Go to Account Settings -> API Keys -> Create API Key
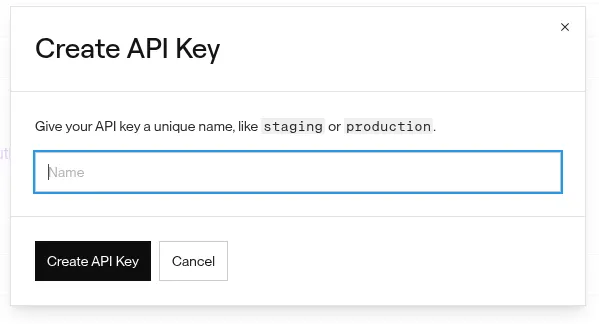
- Copy the generated API Key and save it on GitHub as a secret.
And that’s it! If all went well, when you commit your code to your GitHub repo it should run tests, linting, containerize it and finally deploy to Render!
4. Extras: Security Hardening & Production Optimizations
Add rate limiting middleware for production in src/app.js:
// Additional security middleware for production
if (process.env.NODE_ENV === "production") {
	// Strict rate limiting for production
	const strictLimiter = rateLimit({
		windowMs: 15 * 60 * 1000, // 15 minutes
		max: 50, // 50 requests per window
		message: {
			error: "Too many requests from this IP",
			retryAfter: "15 minutes",
		},
		standardHeaders: true,
		legacyHeaders: false,
	});

	app.use("/api", strictLimiter);

	// Additional helmet configuration for production
	app.use(
		helmet({
			contentSecurityPolicy: {
				directives: {
					defaultSrc: ["'self'"],
					styleSrc: ["'self'", "'unsafe-inline'"],
					scriptSrc: ["'self'"],
					imgSrc: ["'self'", "data:", "https:"],
				},
			},
			hsts: {
				maxAge: 31536000,
				includeSubDomains: true,
				preload: true,
			},
		})
	);
}
5. What’s Next
Recommended Learning Resources:
- Node.js Official Documentation - Comprehensive guide to Node.js APIs and best practices
- Prisma Documentation - Advanced ORM features like connection pooling and query optimization
- Express.js Security Best Practices - Official security guidelines for production applications
- JWT.io - Deep dive into JSON Web Tokens and security considerations
- Docker Documentation - Container orchestration and production deployment strategies
- GitHub Actions Documentation - Advanced CI/CD workflows and deployment strategies
- MDN Web Docs on HTTP - Understanding HTTP status codes, headers, and REST principles
Advanced Topics to Explore:
- Microservices Architecture: Breaking down the monolith into smaller services
- GraphQL Integration: Adding GraphQL endpoints alongside REST
- Event-Driven Architecture: Using message queues and event sourcing
- Performance Monitoring: APM tools like New Relic or DataDog
- Advanced Database Concepts: Read replicas, sharding, and advanced indexing strategies
Congratulations! 🎉 You’ve built a production-ready REST API using modern Node.js practices. This foundation will serve you well for building scalable backend applications. Remember to keep learning and stay updated with the latest developments in the Node.js ecosystem.
Tags:
Related Posts
Design Systems 101: A Beginner's Guide to Building Consistency from Scratch
Learn how to build a design system from scratch and create consistent, professional interfaces. This beginner-friendly guide covers everything from color palettes and typography to components and documentation.
Complete TanStack Router Tutorial: Building a Todo App
Learn TanStack Router from scratch by building a complete Todo application. This comprehensive tutorial covers type-safe routing, data loading, mutations, navigation patterns, and error handling with practical examples.